Hardware MIDI Controller For All Applications (Part 1)
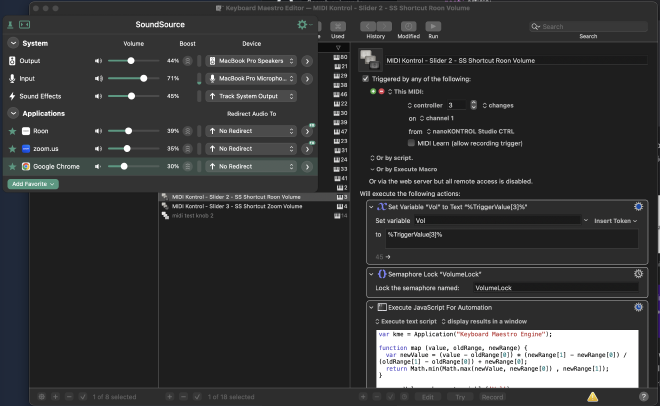
Table of Contents
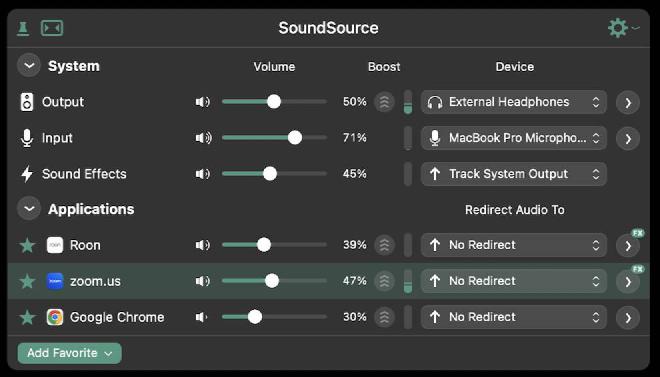
Using a hardware MIDI mixer to control software audio volumes with SoundSource and Keyboard Maestro on macOS.
Equipment/Software Used #
- MIDI Controller/Mixer
- Software Audio Mixer
- Software for Bridging the Hardware to Software Gap
- Apple Shortcuts (included with macOS)
- SoundSource’s Apple Shortcuts Integration
- Provides the binder between Keyboard Maestro and SoundSource.
Implementation Details #
Keyboard Maestro MIDI Integration
Keyboard Maestro allows for the creation of sequences of actions to be performed via a variety of input methods. Usually this is accomplished by various keystrokes or combinations of them, but one of the available methods of triggering them is via MIDI! I leveraged this to accomplish the task of converting MIDI signals from my controller to manipulate the input data and pass it along the path to eventually control the SoundSource mixer.
Simple Button Actions #
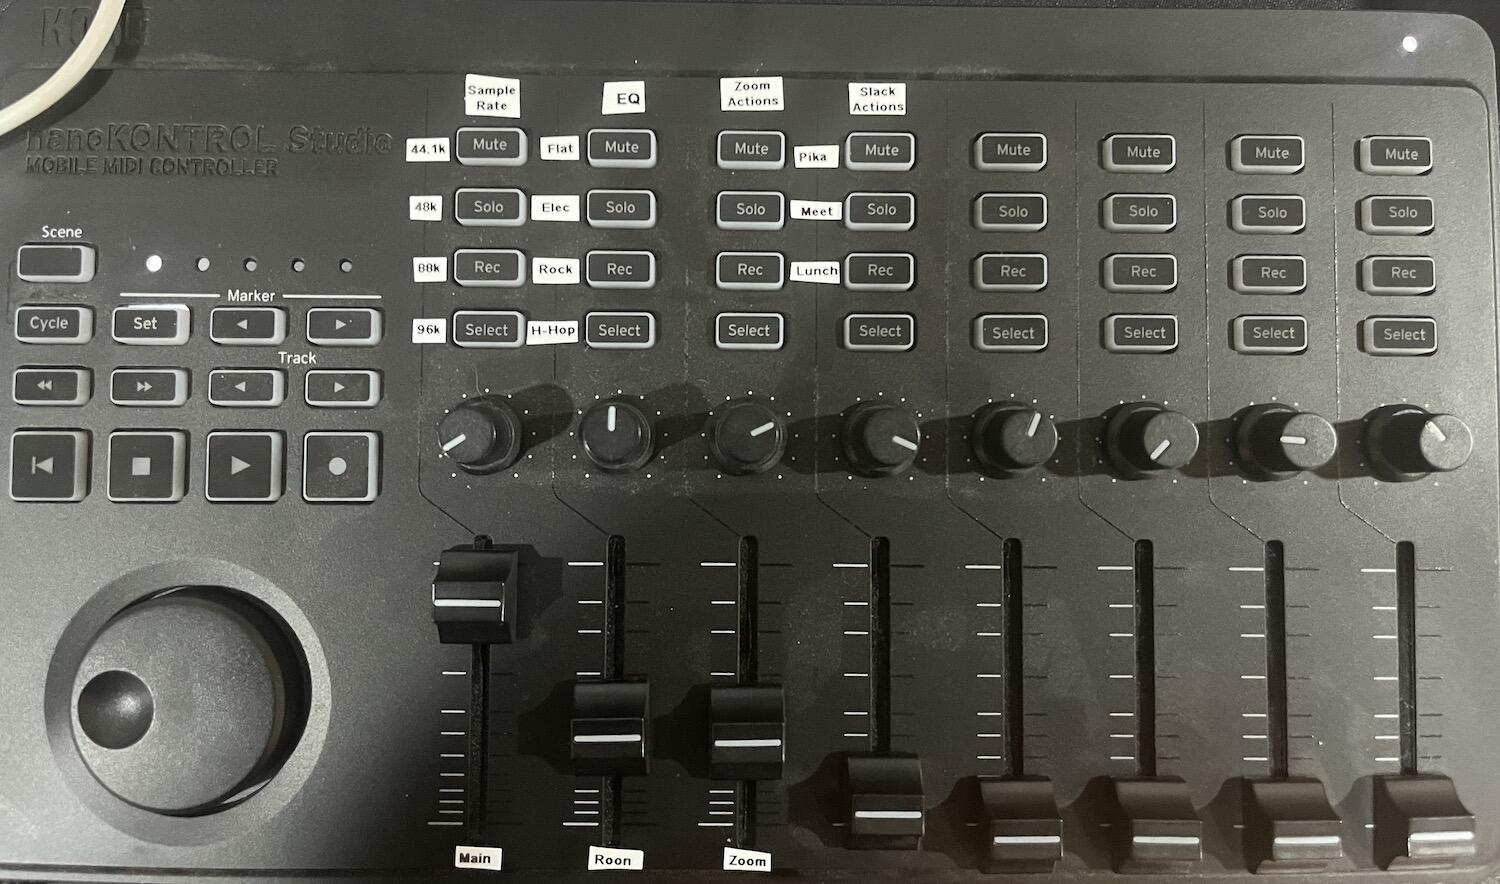
The best place to start is with simple MIDI button actions. I leverage this to quickly set the EQ for different songs on the fly or trigger other non-music actions that I’ve programed in. Once you’ve set up the first, it’s easy to quickly add more as you see fit. This example will be targeted at changing the EQ for a single application or system-wide (however you want to do it).
Keyboard Maestro Steps #
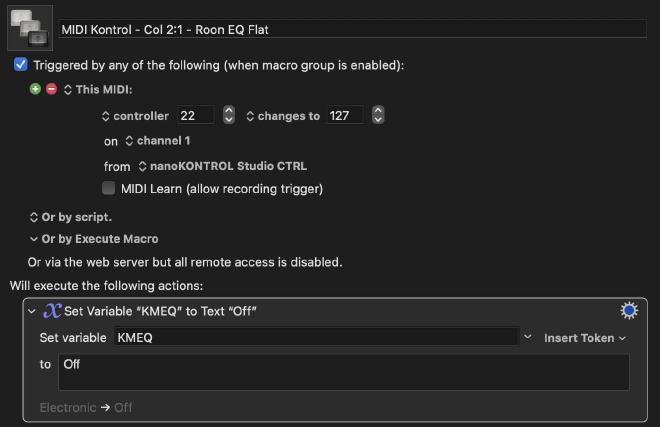
- Start by creating a new macro in Keyboard Maestro. Name it something like
MIDI controller EQ off(or whatever EQ action this button will perform), click theNew Triggerbutton, and chooseMIDI Trigger - Change the dropdown with the value of
noteto be the value ofcontroller. - With the
MIDI Learncheckbox checked, click a single button on your MIDI controller/device - The
controllertext input should have changed to the MIDI number of that input- Once that’s complete, uncheck
MIDI Learnso you don’t override the device number - Change the dropdown to the right of the
controllertext field fromis pressedtois released. This helps prevent double inputs and gives a more “natural” experience.
- Once that’s complete, uncheck
- Click the
New Actionbutton at the lower end of the pane on the right- In the search bar of the newly opened middle pane, search for
Set Variable to Text, then drag the time to the bottom section of the pane on the right under the “Will execute the following actions:” header.
- In the search bar of the newly opened middle pane, search for
- In the new section that appeared, enter the following values (note: you will need to do this for each EQ preset that you want to have a hot button for):
- ‘Set variable’ -
KMEQ(You will be using this same variable for each EQ macro and the Apple Shortcuts so make sure you note it down and keep it consistent) - ’to’ -
Off
- ‘Set variable’ -
- Save your macro and navigate to the Apple Shortcuts app that is included with macOS, but don’t close out Keyboard Maestro.
Apple Shortcuts Steps #
Once you’ve loaded the Apple Shortcuts app, do the following:
- Click the
+button in the toolbar to create a new shortcut - In the search dialog in the top of the right side pane, search for
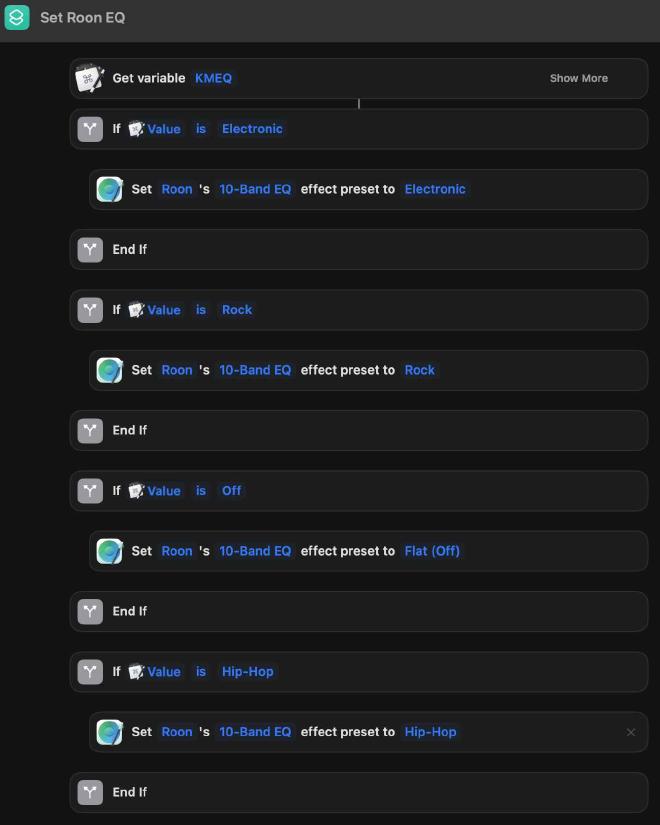
keyboard maestro, and in the filtered list double clickGet Variable - In the new item at the top of the center pane, click where the pill icon says
Variable, and change it toKMEQ - Clear the search dialog and search for
if. Double-click on it when it shows up in the filtered list.- Delete the
Otherwisepill in the middle of theIfblock by clicking on thexon the right side of the pill. - In the
ifblock, click theConditiontext, then chooseis, then click theTextsection and enterOff- This last value is the name of the EQ preset that you are trying to activate. In this example it is
Off, but if you are continuing on, it would be whichever you are currently trying to configure. This MUST match one of the variable assignments you made in the previous Keyboard Maestro steps, otherwise it will not trigger a valid EQ preset.
- This last value is the name of the EQ preset that you are trying to activate. In this example it is
- Delete the
- Next, clear the search dialog again, and now enter
soundsource - Drag the list item
Set Source Effect Presetin between theIfandEnd Ifpill boxes- Add the following information
Source- Choose the name of the application to apply the effect to from the dropdown (Roon in my example). If you don’t see your device listed, delete the item you just added between theIfblock, open the target application, play some sound through it, and try again. The application should now show up in theSourcedropdown list. If not, you can enter the name manually making sure that the name matches exactly how it’s shown in SoundSource. This IS case-sensitive!Effect- Choose from the dropdown one of the effects that you have enabled through SoundSource for that application (10-Band EQ in my example)Preset- Choose from the list of presets that are provided.Flat (Off)in my example.
- Add the following information
- Save your work to something descriptive!
Set Roon EQin my case. Then switch back to Keyboard Maestro. (Note you can finish configuring Shortcuts fully before heading back to Keyboard Maestro, but for the sake of brevity we won’t)
Back in Keyboard Maestro #
Make sure that you are still in the Macro that you were before and do the following:
- Click
New Actionat the bottom of the pane on the right - Search for
Execute Shortcutand drag the result below yourSet Variableblock configured previously.- Click the small downward arrow to the right of the
Execute shortcutdialog and select the name of the shortcut you just created. (note: if it does not show up right away, try closing Keyboard Maestro and/or Shortcuts and reopening them.)
- Click the small downward arrow to the right of the
Final Product #
That’s it! You should now be able to trigger the EQ setting to whichever application you configured (Roon in this example). You can keep adding more by repeating the same steps above with the following things in mind:
- You MUST use the same Keyboard Maestro variable (
KMEQin my example) for all the Keyboard Maestro triggers. Since that is what is sent to that single shortcut, the value should be unique. - When expanding the Shortcut, simply add a new
Ifblock, deleting theOtherwiseblock as before, and match it with the value from the Keyboard Maestro variable value.
Next Steps #
The second part to this article, which covers using sliders and knobs to control independent application volume levels, can be found here.